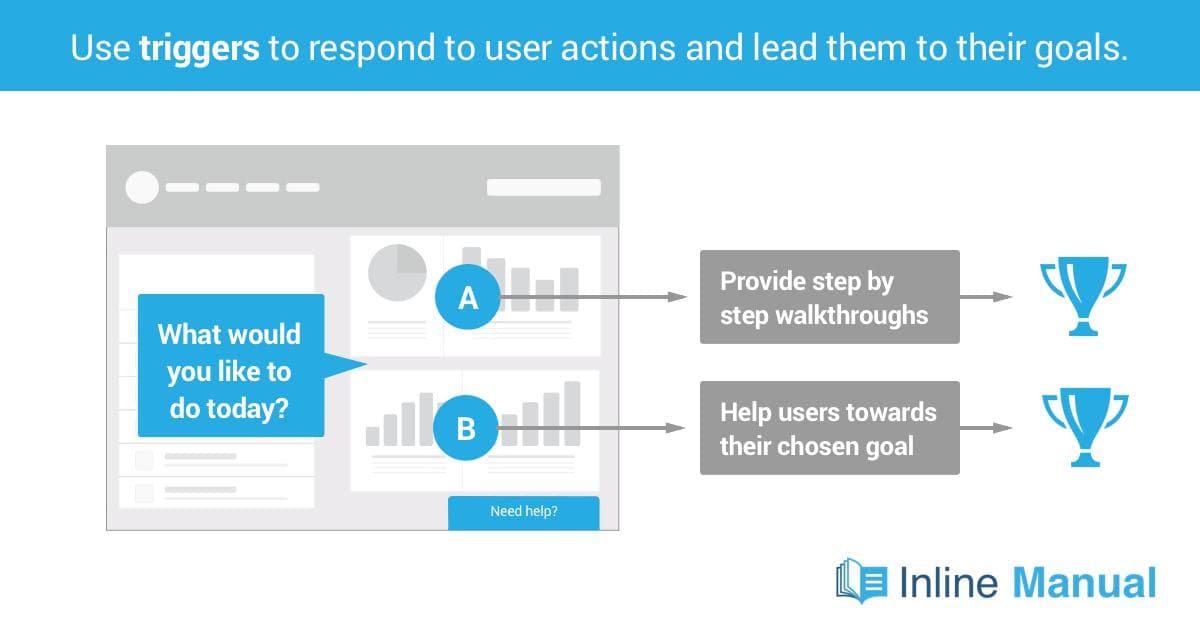
The trigger is the most important component that advances a user’s progress through your walkthrough. With triggers, you can react to user activity and bring users to the next step in reaching their goals.
How do triggers work?
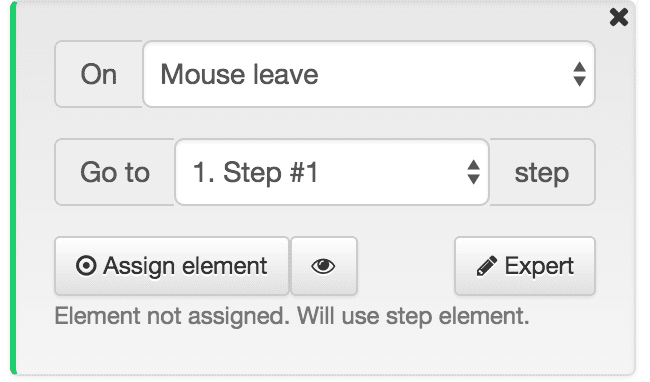
A trigger has three parts
- An event: What does the user do? Click something, hover over something
- A destination: Where should we go? Jump to a step in the walkthrough.
- An assigned element: What are users interacting with in your UI? By default this is the step element, but each trigger can be assigned to its own element.
For example, you might have a step where users click the assigned element, and the walkthrough advances to the next step. Or you may have a step where users have several potential options to choose from, and each should go to a specific step in your walkthrough. These are examples of when you’d use Triggers. Without triggers, you have no way to get users to the next step in a walkthrough.
Check out the help page for an in-depth look.
Major trigger update!
We’ve just updated Triggers to give you more control over the types of events you can respond to and also where users can go.
- More mouse events. With the addition of Mouse enter and Mouse leave, you can respond better when users interact with dropdown menus or other elements which appear on mouse hover actions.
- Go anywhere! Before, the only available action was to go to the next step. Now you can go to the Next step, Previous, any step available in your tour, or even deactivate the topic.
- Easier to identify multiple triggers. Each new trigger is color coded to make them easier to identify. Click the eye button and the element you have selected which be outlined in that signature color.

- Sensible default options, with Expert control available. When you assign an element, our Authoring Tool will choose the best and most specific element. However you might want to manually edit this selection, and you can now by clicking “Expert” mode.
These changes make it easier to create triggers to respond to user actions in your UI.
Easier to manage Dropdown menu actions
Say for example you have a dropdown menu, and by Step 2, you’re directing users to select from a sub-menu of options. What happens if they move their mouse out entirely and the menu closes?
In this case, two triggers are better than one. You can start with one trigger which responds to a click and advances your user to the next step. By adding a second trigger, you can have a fall back to go to Step 1 again.
To find out more, check out this tutorial on managing drop down menus with triggers.
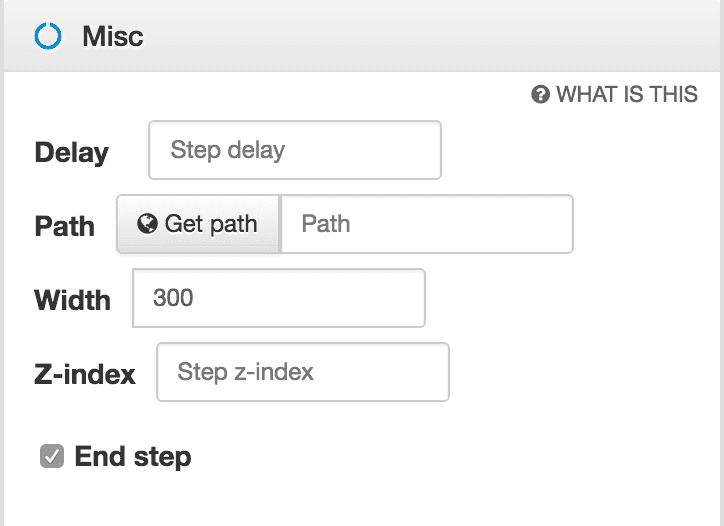
Indicate your final step
Using Analytics, our customers like to track whether their users complete a tour. Usually, this is the final or end step on the list by default. Now with the availability of multiple triggers from a step, you can create a kind of branching in your tours. For this reason you might have multiple valid end points you want to track.
For example, on a specific step, you might offer the user to choose from two possible options. From there, they might have one more step to complete, but each “end step” will be different depending on which option they chose. If a user reaches either of those end steps you want to know they completed their task.
Now you can specify which steps you would like to track as End steps. Under the Misc panel for a step, enable End step. And you’re all set!
Want to learn more?
We’ll take a closer look at triggers in our webinar on Thursday, 8 September. Sign up to find out how to create engaging user onboarding and tutorials.